11 THINGS
You Might Not Know About SRAM RED eTap
Although there are more reviews and articles written about SRAM RED® eTap® than any other product in SRAM’s history, there are many features unique to eTap that are still relatively unknown. In this article, we review 11 of these features to give greater insight into eTap’s capabilities.

1. You can micro adjust the rear derailleur while riding.
Although the micro-adjust feature of SRAM RED eTap rear derailleurs does essentially the same job as a mechanical derailleur’s barrel adjuster, with eTap you can make the adjustment at the shifter while rolling down the road. For example, if your rear derailleur is making a little noise in certain gears when the chain barely rubs against a larger cog on the cassette. To move the rear derailleur outboard to eliminate the noise, just hold down the function button of the right shifter, execute a “shift,” then release the function button after the adjustment is made. Rather than shifting the rear derailleur to the next outboard cog, when the function button is depressed, the rear derailleur will instead perform a micro adjustment and move 0.25mm in the direction of the chosen shifter each time an adjustment is made. So if you want to smooth out shifts to larger cogs, micro adjust the rear derailleur inboard with the left shifter. If you want to smooth out shifts to smaller cogs, micro adjust the rear derailleur outboard with the right shifter. It’s that easy. Best of all, because eTap has no cables to wear out, you’ll only need to make these adjustments once.

2. You can send shift data to certain head units, both to see gear selection in real-time and to collect training data.
While shifting communications are handled over our proprietary Airea™ network, the eTap rear derailleur, which collects information from the other eTap parts, also contains an ANT+ transmitter. Many head units from Garmin, Wahoo, Lezyne and others can receive the data transmitted by the rear derailleur over ANT+ and display gearing and battery charge in real time. Some can even store the information in the workout file so a coach or third party app can analyze the amount of time spent in each gear. Please consult the individual head unit manufacturer for information on which models can communicate with eTap, and what the specific capabilities are.

3. You can use function buttons on the derailleurs to shift.
When tuning the front derailleur and performing test shifts you need one hand to turn the crankset and one hand to initiate the shift. To execute a front shift with one hand simply press and release the function button on the front derailleur. This will toggle the front derailleur between its two positions without requiring you to remove your other hand from the pedal as you turn the crankset.

The rear derailleur has similar functionality. Press and quickly release the function button on the rear derailleur and it will shift outboard. Press and quickly release the function button twice in rapid succession (think computer mouse double-click) and the rear derailleur will shift inboard.
4. Depending on the chain's position on the cassette, the eTap front derailleur optimizes front shift quality by changing how far it moves the chain.
Although SRAM RED eTap front derailleurs are compatible with SRAM’s chain watcher, eTap front derailleurs don’t ship with one. In contrast, our mechanical RED front derailleurs do. Why? A chain watcher isn’t required with eTap’s smart front shifting functionality. Depending on which gear you’ve selected on the rear derailleur, the eTap front derailleur will vary how far it initially moves the chain before settling in a moment later to its final position relative to the chainring selected.

For example, if you are in the large chainring and the large cog (big-big) and you need a lower gear, so you shift your front derailleur to the small chainring. To avoid pushing the chain past the small chainring and onto the bottom bracket, eTap front derailleurs only move as far inboard as is required to move the chain off of the large chainring and onto the small chainring. A moment after this movement is made, the front derailleur will move the rest of the way to its final position—a position that is the same no matter which gear you’ve selected in back. The final position of the eTap Yaw front derailleur will allow access to all of the rear cogs with no chain rub; it therefore doesn’t require a trim function, meaning that once a front shift is fully completed, the front derailleur will stay in exactly the same spot regardless of the rear cog you select following the completion of your front shift.

5. There are more differences between a standard eTap rear derailleur and a WiFLi eTap rear derailleur than just the cage length.
In addition to the longer length of the cage on the eTap WiFLi rear derailleur, the position of the upper pulley is different as well. On a standard short-cage eTap rear derailleur the upper pulley is concentric with the cage’s pivot; whereas on a WiFLi eTap rear derailleur, the upper pulley is offset to provide greater clearance between the pulley and the cassette.
The other big difference is that the WiFLi eTap rear derailleur mounting bolt is positioned both higher and further rearward than it is on the standard short cage eTap rear derailleur. This positions the rear derailleur lower down and further forward in relation to the cassette and generates increased clearance between the upper derailleur pulley and cassettes with big cogs as large as 32-teeth. For this reason, simply installing a long WiFLi pulley cage onto a standard eTap rear derailleur will not make it compatible with cogs larger than 28-teeth.

6. The aero BlipBox™ is a shifter that can be used without Blips.
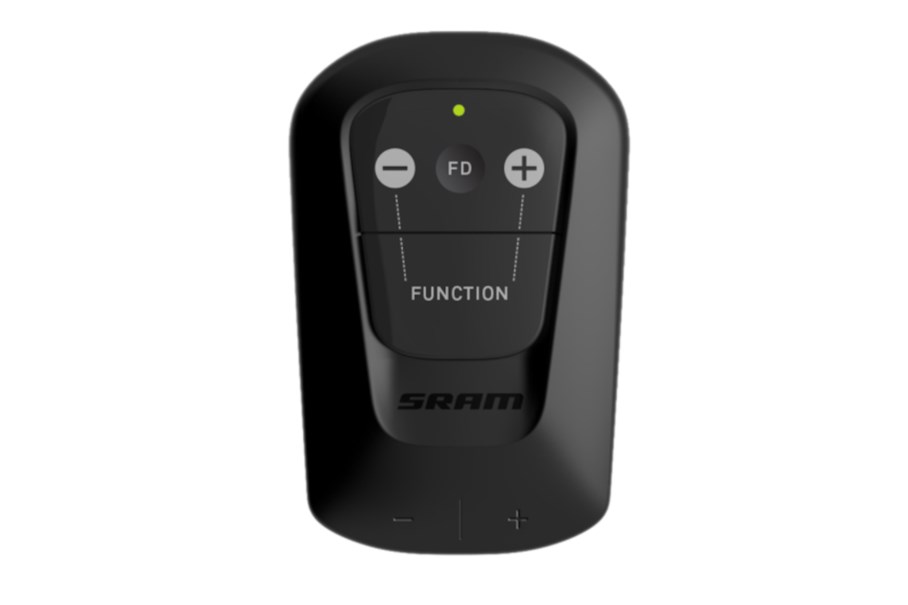
Here’s a trick used by some of SRAM’s para-athletes: you can shift both derailleurs in both directions with one hand using a BlipBox with no Blips or Clics™ (remote shifter buttons) attached. This is possible because the eTap BlipBox is a shifter. Just use the left and right buttons on the top of the BlipBox to move the rear derailleur inboard and outboard and press the button marked “FD” in between them to shift the front derailleur.

7. Use a BlipBox as a temporary shifter when working on a drop bar eTap bike.
Because pairing eTap derailleurs and shifters only takes a few seconds, some of our pro mechanics and shops came up with this trick to make the eTap installation and tuning process even easier than it already is. When assembling a drop bar bike, after bolting on the derailleurs and shifters, they pair an aero BlipBox to the derailleurs instead of the drop bar shifters. Because the BlipBox is a wireless shifter, the mechanic can shift both derailleurs both directions with just their thumb while they use their other hand to turn the cranks. Once the tuning is done, they pair the derailleurs to the drop bar shifters to complete the installation.

8. Use Blips (remote shifter buttons) to do all your shifting with one hand.
Blip remote shifter buttons plugged into drop bar shifters perform the same function when pressed as the shifters they are attached to. That means if you have at least one Blip per shifter (you can have up to two) you can shift the rear derailleur in both directions by pressing the Blips individually and shift the front derailleur by pressing a Blip from each shifter at the same time.
So let’s say you wanted to use your right hand only to shift the derailleurs. To do this just place a Blip plugged into the left shifter next to a Blip from the right shifter anywhere you want on the right side of the handlebar. With a Blip from each shifter sitting right next to one another, you can perform all shifting operations with your right hand. To do a front shift with this setup, just use two fingers to press the Blips simultaneously. No matter what width your handlebars are, SRAM makes a Blip with the right length wire for your application. Blips are available in 150mm, 230mm, 450mm, and 650mm wire lengths.

9. There is more than one way to tape around Blips.
Not only can you place Blip remote shifter buttons anywhere you want them on the handlebars, you have a few options on how to tape around them. You can tape over the Blip for a stealthy look or tape around the Blip for a more tactile feel. If you are only planning on using Blips when riding on the tops of the bars, you might prefer to use BlipClamps to attach them outside of the tape zone right next to the handlebar clamp.

10. Install clip-on aero extensions that you can shift from on a drop bar road bike.
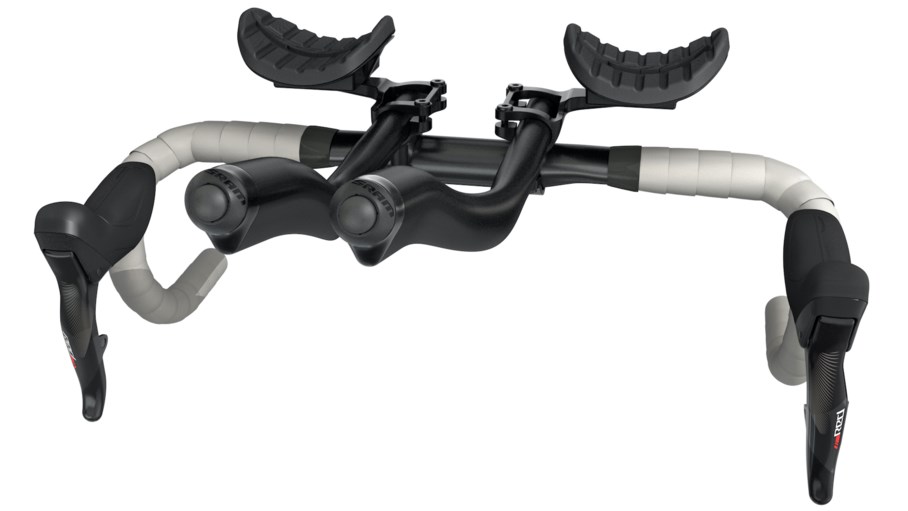
While you can install clip-on aero bars on a drop bar road bike with mechanical shifting, you can’t shift from the aero bars. With eTap, you can shift from both hand positions, and best of all, the installation is incredibly easy. Once you have your clip-ons installed, all you have to do is attach a pair of eTap Blips or Clics remote shifter buttons to the ends of your aero extensions, then unwrap the handlebar tape down to the shifter, plug the Blips or Clics into your drop bar road shifters, rewrap the tops of your handlebars (now with the eTap Blips or Clics wires underneath the tape) and you are done. With this setup you can shift from both the handlebars and the aero extensions. Change your mind and want to remove the clip-ons? No problem, just reverse the process.

11. eTap drop bar brake levers have micro-tunable Reach Adjust™.
No matter what size hands you have or how you prefer to set up your brakes, eTap brake levers can be set up to fit you perfectly. All it takes is a 2.5mm hex key to access the adjustment screw on the side of the shift lever for mechanical braking eTap levers or underneath the shift lever on hydraulic eTap HRD levers.
Learn more about SRAM RED eTap here.